Bad weather, Christmas, the flu and now a cold have slowed progress on the addition. But we're toughing through it and continuing to work. The exterior walls are all up and sheathed.
We chose to use 1/2" APA rated OSB for the wall sheathing. My understanding is the OSB has come a long way in the last 10 years and isn't the water sponge it used to be. It was about half the price of plywood (CDX) and they are rated the same - So by going with OSB, we saved about $350 between the walls and the roof sheathing.
We spent some time nailing Simpson ties to the sill plate and each stud. Simpson has a pretty good thing going for themselves since the plate metal ties they make all require (in my case) 8D and 10D nails that are 1.5" long. They are not standard nail sizes and guess what? Simpson makes them! Expensive buggers! Once the sill/stud ties were in, we sheathed the walls leaving an opening in the south wall to allow trusses to be brought inside and raised from there.
We also tied the new walls into the existing structure at both intersecting points using an 18" 16 gauge metal tie, also made by Simpson. This required me to hop up on the roof and rip off shingles at both corners of the house, then cut back the wood in order to nail down the metal ties. I was skeptical of how much strength this would add to the new structure, but it was required by code, so in they went. BIG DIFFERENCE! The walls were fairly firm before, but after tying them into the existing structure with the straps, everything is rock solid! Nice!
I had started nailing Simpson H2.5 hurricane ties into the studs and top plate prior to sheathing, but discovered that the act of nailing a tie into a stud caused the stud to become somewhat loose. I figured nailing them in after the sheathing was up would be better since the sheathing would give the studs some rigidity - So I gave that a shot the other day, but it still cause the studs to become loose. So I've decided to nail the ties into the top plates and then screw them into the studs using special 10D structural screws made by Simpson - We have some already since thats what I'm using to put the hangers on the trusses.
The trusses were delivered on the 23rd. There are three main trusses that span the entire length of the addition. The heaviest is about 106 pounds and the other two are about 90 and 80. I figured this would be a bit much for two people to raise, hold in place and secure, so I was able to get my dad and my brother over on Christmas Eve to help. They were a huge help and I can say with 100% certainty that we couldn't have done it without them.
We started by raising the first truss up, then laying it on the roof of the existing house for later use. Then we raised the third truss (the heaviest one) which is the "girder" and receives all of the jack trusses since this is a hip roof. We put the girder truss in place, then while two people stabilized it, we put up one jack truss to give the main truss some lateral support. Once that was done, we were able to let go of the girder truss and put up a couple additional jack trusses. Then we moved back to the main trusses and raised/secured the second truss and tied in temporary supports the the third truss for stability. Then the first truss was raised off its position on the existing roof and put in position.
By the time we finished with putting the three main trusses up, it was getting late in the day. We added some addition supports to help stabilize everything since there wouldn't be much work done until the following weekend. Tipsy trusses are very dangerous! I'd say we put in the minimum amount of stabilizers and I fully intend to add more 2x4s to everything before we start sheathing the roof.
I spoke to a reputable roofing company this morning and I think instead of shingling the addition and tying into the existing roof shingles, we will just replace the entire roof. Its $4000 more to do it that way, but in addition to looking nicer (no more white roof, and no obvious bright white new shingles next to 20 year old dingy shingles) the old shingles were getting pretty old and we have at least one leak that we know of.
We thought about doing the roofing ourselves, but putting up 16 squares of shingles for two non-roofers is a project I don't want to tackle. Too many opportunities for injury and screw ups, not to mention it would probably take us 2 months (working weekends). We can have a crew in to tear off the old shingles and put on the new roof and they'll be done in a few days.
So our next priority is to finish the trusses, over frame the old roof to the new and sheath everything so the roofing crew can get to work. I'll be a lot less stressed out once we have a roof on to keep the rain out! Its a three day weekend (Happy New Year!) and I'm hoping to make significant progress! If we can get the trusses and over framing done this weekend, we can sheath next weekend and have shingle up the following (two weeks from now) week. We shall see!
Friday, December 30, 2011
Monday, December 12, 2011
Framing In The Rain!
We started framing this past weekend. I had originally hoped to have all three stud walls build and erected by Sunday evening, but that didn't happen.
Jason ended up coming down with the Flu on Thursday and still wasn't 100% by Saturday (or Sunday for that matter), though he did help with the project quite a lot. We also spent about an hour getting new tires for Jason's car on Saturday. The major time sinks I wasn't counting on were re-stacking the lumber (the delivery guys put everything in a pile with the studs at the bottom, of course), filling in the very large hole I dug to tie into the clay sewer line (safety first!) and cutting back the roof line flush with the existing house. I originally anticipated only about an hour to cut back the roof, but the odd angle, precarious position and numerous rafters that had to be cut using a sawzall ended up making the job take about 2 hours instead. Add a late start (10am) and you end up with a pretty short day as far as getting work done.
Once the roof was cut back and the slab swept clean, we got out the measuring take and chalk line. It turns out the slab is a bit out of whack with some slightly wider/narrower parts when it comes to the edges. The worst area is about 1.25 inches narrower than the rest of the slab (right up against the house). To fix this problem and frame square walls, we adjusted the sill plate measurements to account for the discrepancy, snapped a chalk line and used the 3 4 5 method to determine if we were square at both corners - We were! For those that don't know the 3 4 5 method, lets think back to grade school algebra (or maybe high school) where we learned the pythagorean theorem... Back then, you were probably thinking "What the hell am I ever going to use this for???" Well the 3 4 5 method IS the pythagorean theorem in the simplest terms. If you measure from a corner 3 feet along one wall and 4 feet long along the other wall, the diagonal measurement between the two points will be 5 feet IF you have a perfect 90 degree corner. Yay algebra!
So once we chalked and double checked all the corners, we started putting together the first wall. The night before, I had spent some time with my floor plan, some graph paper and an architects ruler. I drafted each of the three stud walls with notations on measurements for intersecting walls, doors, windows, etc. This made framing much easier since I could just look at the drawing and cut each piece based on my previous measurements.
I decided to start with the front (south) wall since it is the most simple - It has no openings...Just a solid wall. The wall is about 12'4" by about 8' tall. We're framing all exterior walls with 2x6 lumber. By the time we started building the first wall, it was already getting late in the day. Once we finished, it was close to dark and we had a x-mas party to go to, so we cleaned up early and called it a day.
Sunday morning we headed outside at about 9am and decided to lift the wall we built the day before to determine its weight and whether we could get away with sheathing it while it was still on the ground. We quickly decided that the wall is already too heavy and will likely be very difficult to position on the anchor bolts even though we already drilled the holes and dry fitted the plate. Considering the 12 foot wall was heavy, I cant imagine trying to lift a 24 foot wall...
With this new realization, I decided that the remaining two walls should be framed in place. Framing in place takes me twice as long as framing flat on the ground, but it would enable us to do the framing ourselves without having a third or fourth person come help. So we marked and drilled the pressure treated sill plate for the second 12 foot wall and bolted it to the slab with a foam "sill seal" that gives the wall plate an air tight seal to help with insulation and keeping bugs out.
Then I set out measuring and marking the plate for each stud and transferred the marks to the top plate. Since this wall has a very large window, I decided to start framing the window area first.
I laid out the cripple studs, then the jack studs and finally the king studs. Due to the length of the window opening, I designed the opening with double 2x6 jack studs to support the header (which is a double 2x8 advance framed with rigid insulation in the middle).
We tied the wall into the existing block house using three lag bolts. Once the other walls are up, we will also put a 12 gauge 18" metal strap from the top of the main house to the top of the addition walls. The finished wall as seen in the rain this morning:
We were running out of daylight and I really wanted to get the sill plate for the last wall in place. Measuring and marking for anchor bolt holes is absolutely a 2 person job, so having Jason there to help was essential. We finally got it finished up just after dark and then cleaned everything up.
The weather forecast called for clouds on Monday (today) and rain Tuesday. I figured that worked just fine since I could tarp everything tonight. Well - If you've ever lived in Phoenix, you probably know that the weather forecasters are great at forecasting sunny days. But once it starts hinting at rain, they lose all reliability. As it turns out, the original 10% chance of rain for today turned into a 70% chance. I spent about 30 minutes this morning moving the lumber pile from the grass in the front yard to the slab and put everything on blocks. I did my best to cover the unused lumber from the rain, but most of it was already somewhat wet.
Water wont hurt lumber or the frame we already put up as long as it gets a chance to dry and is kept from *standing* water which will of course soak it through. I'm less worried about the wood than I am about the exposed attic space created when we cut back the roof. The water runoff from the roof is dripping a little on the exposed top plate. I had originally planned to tarp off the roof tonight before it started raining. Unfortunately, the roof is now far too slick for me to get up there and safely tarp it. My hope is that the rain will be slow and steady instead of hard and fast. This should keep everything relatively dry and any wet insulation can be removed next weekend and replaced later on.
The rain is supposed to last through Wednesday and clear up Thursday. I may try to take Thursday off from work to more framing done since they are calling for additional rain on Saturday. It really never fails... It hasn't really rained in Phoenix for about 8 months, but since we began this project a month ago, its rained 4-5 days. Go figure.
Friday, December 9, 2011
The Great Concrete Pour of 2011
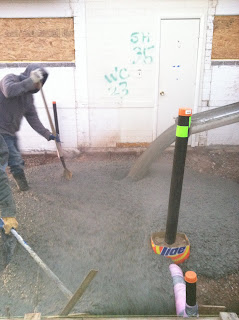
After wrapping all the pipes in foam, all the plumbing trenches were backfilled and packed. I boxed out the shower and tub drains with cardboard to allow easy access later when its time to finish them up. The concrete guys came and epoxied the rebar dowels into the existing house foundation/slab, spread some gravel and compacted everything. The inspector came and passed everything.
The next morning, the concrete crew showed up at 6AM (it was still dark out) and started the last minute work. The concrete truck arrived at 7AM and the pour commenced.
Concrete guys stripped the forms later and smoothed everything out. Framing starts tomorrow, provided I don't catch Jason's flu. Hopefully he starts feeling better quickly.
Sewer/Drain Plumbing
With the footing for the foundation excavated and forms in place, it was time to install the underground drains (DWV - Drain, Waste, Vent) for the new shower, toilet (WC), tub and sink (lav). I opted to do this work myself since the plumbers I talked to wanted thousands of dollars to do the job.
I did hours of research to learn the proper way to make DWV connections that are code compliant. I spent many hours reading plumbing forums, plumbing articles and sketching out how I hoped my system would come together. Then I went to the supply house and grabbed the parts from my list. In all, it took about four different trips to the plumbing supply store to get various things. All DWV parts are ABS plastic.
The parts cost me about $450 which includes some extra pipe I will use later for vents in the walls. Much of the time I spent on this project went toward digging. Jason helped quite a bit with that process. We located the clay sewer line nearly three feet underground. I used a snap tool (rented for $10) to cut the line and I stuffed a rag into the line to keep debris out and sewer gasses in while we worked.
We trenched out the layout for the drain lines and started making connections at the clay pipe using a "fernco" fitting that clamps around the new 4" ABS pipe and the old 4" clay line. A few inches from the ABS to clay connection, I put in a 4" Test Tee which will allow us to easily plug the line later for a pressure test. About a foot up from that, I put in a two-way clean out which extends vertically to a few inches above the ground level. This clean out will allow a roto line to be fed into the system in the event of a clog.
After the two-way clean out (keeping in mind that we are working in reverse of the direction the drain water will flow) I reduced the line to 3" and ran it under where the new concrete footing will be. I used a wye fitting to branch off the main 3" line toward each individual drain. In some cases, the wye fitting included another angle to get the pipe moving in the right direction. I'm not going to get into code requirements here, because there is just too much information to put down. You can see an example of the branch off in the picture below. The main pipe runs through the middle from right to left (further to the right is the clay line and to the left the line runs to the toilet and shower). You can see the lav (sink) drain branching toward the bottom left and the tub drain toward the top right. We made sure all lines had the required 1/4" per foot drop so that the water would flow down stream. We also tediously hard packed dirt under and around the pipes (a process called "shading") to keep the pipes in place and prevent sagging.
Because I'm not a plumber and all the intricacies of properly connecting and venting drain lines is still somewhat of a mystery to me, I decided to vent each fixture individually instead of trying to wet vent anything. A plumber would no doubt have found the way I ran the lines more work than necessary, but I guess that's why they make the big bucks! I verified with some plumbers that the way I designed the system would work, and they said that it would, even though it was complicated. As you can guess, they did NOT tell me how THEY would do it, and I can understand that.
Below, you can see a couple pictures of the shower, WC and tub drains and their vents. I attached a 10 foot mast to the shower drain in order to perform the mandatory water test. For the test, you plug off the main line (in this case, before it drains into the clay line), and stick a hose in the 10 foot mast, filing the system with water. As each opening in a fixture drain and vent overflows, you cap off the line, ending with the mast overflowing, at which point you turn off the water. By doing this, you have filled the entire drain system with water and because you have a 10 foot mast that is also filled, you have created roughly 5 psi of pressure in the system. Once the system was filled, I went around and checked fittings for any leaks. Not finding any, I checked the water level at the top of the mast after about 45 minutes (code requirement here is 15 minutes) and found it to be full.
I left the system filled and the ladder in place for the city building inspector who was scheduled to arrive sometime that day. I received a call from the inspector several hours later. She told me that the drain system passed inspection and she had also passed the footing rebar inspection. Hurray!
That night, I rushed to get the drains wrapped in foam to protect them from the concrete. The concrete crew was set to arrive first thing the next morning to grade the area and the inspector would be back later that same day to do the pre-slab inspection. No time to waste!
Footing Excavation!
So the concrete crew (one of just two parts of the construction we plan to contract out) came and laid their form work and excavated for the 16 inch wide, two foot deep footing. These guys worked hard and were very fast. They also finished chipping up a bit more of the old slab. They got it down to 4" below finish floor and they'll just pour the new slab right over it.
Demolition - Its time to break stuff!
With the building permit obtained the week before, demolition started on November 12, 2011. We rented a 10 yard dumpster and broke out the sledge hammer, pry bars, face masks and gloves. Here is what we basically started with (though we had already removed the windows by the time I remembered to take a picture):
We tore into the "wet wall" and found the old cast iron vent and exposed the clog prone lateral sink drain...
Yuck! Here is the mold infested shower stall after the tile was knocked out:
Down to studs:
Down to Stud...yes, just one:
Ok, at this point, we got up on the roof and started cutting rafters...
Jason never saw me run as fast as I did when this thing finally started to come down.
Roof is finally down!
Goodbye block wall...
Goodbye slab! If you've ever jackhammered 45 year old concrete, you'll know how much fun this was...
Demolition complete!
Research, Planning and Permits... Oh My!
When we bought our house in 2008, it had two bathrooms. The original bathroom (built with the house in 1953) measures roughly 5x7 feet and has a sink, WC and tub with shower fixture. The additional bathroom (built in 1967 according to permits on file) measured roughly 6x8 feet and had a sink, WC and shower stall.
Upon moving in to the house, it became apparent that the bathroom added in '67 was in pretty bad shape. It had a flat roof, deteriorating wood siding, signs of mold in the walls and other problems. It was built without any air duct, so in the summer it got very hot and in the winter it was unbelievably cold in the mornings. It also had no air vent to remove moist air from the room. I'm sure all of this contributed to the poor condition of the walls and what later became an apparent and sever mold problem.
SO - We decided to bite the bullet and build a new bathroom. The severe mold, flat rough, and lack of compliance with just about any building code in Phoenix meant that complete demolition of the existing bathroom structure would be the way to go. Since we were going to go to all the trouble and expense of demolishing the structure and rebuilding from the ground up, we figured we might as well do it right and build a bathroom we would really be happy with and add on a walk-in closet at the same time.
I started thinking about layouts and ideas during the summer of 2011. By September 2011 I was well into drafting floor plans and researching what I would need to give the Building Department in order to pull a permit. I decided overkill was the way to go and prepared a full set of plans, including site plan, floor plan, electric, isometric plumbing, reflected ceiling, roofing, foundation, demolition, elevation, details and lots of notes about compliance with codes and building methods. I worked on the plans whenever I felt like it at night and on weekends. The whole drafting process from start to finish probably took me 40-50 hours. Not too bad considering I'd never drafted a building before, did everything with pencil, paper and an architectural ruler. What I ended up with was a six page set of plans on 24"x36" paper. Copies at the local copy center cost me about $4 per page. Here is a quick view of the floor plan:
Enter the Building Official! I figured getting a permit would be an interesting experience, but I never figured it would be so darn expensive and frustrating. The building official who reviewed my plans decided that I would need a larger water meter ($700), new water service line ($500-2000 depending on material used), AFCI compliant wiring in the bedrooms (even though we aren't working in the bedrooms), compliance with current electric code with regard to the service line (even though we aren't working on the electric panel) and that the aluminum patio cover in the back was installed without a permit - Never mind that it was probably installed in the 50s or 60s.
After getting back my red-lined (building officials remarks) plans, two things were immediately apparent. First, the guy who reviewed my plans has a massive stick up his ass. Second, the city is out to collect every cent they can from people trying to do home improvement projects. Here is a breakdown of amounts paid to the city for my permit:
$440 Plan review
$440 Permit
$90 Water Meter
$700 Water Meter Change Fee (took the guy 15 minutes to do)
$1,670 Total paid to the city for a piece of paper that says I can build. Good gravy! I paid it (whilst privately grumbling), took my permit and went home. The initial plan review took the building official about 5 days. The revised plans (changes I made to satisfy his red-lined comments) took him just over two weeks to review and release. Between my four visits, I spent about 3 hours total down at city hall to get this done, which is less time than I would have thought. I still have to go back to submit my truss calculations once they are ready and to fill out a form for a permit on the 50 year old patio cover...
Subscribe to:
Posts (Atom)